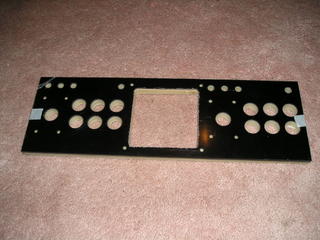
 Now it is time for me to start thinking about putting the control panels together. My Player 3/Player 4 control panel needs some artwork before I can install all of the buttons and the trackball. It is pictured to the left and the dimensions are exactly 21" x 6-3/4". As you can see, I am going for the traditional "Street Fighter" six-button setup which will allow me to play most horizontal games in MAME (I'm a huge fighting game fan but I suck at them). There is also going to be a trackball in the middle where the large square cutout is located as well as several admin buttons along the top such as Player 1 Start, Player 2 Start, Exit (to the list of games), Pause, Insert Coin (in case you don't have a quarter), etc. I don't want anything fancy for the CPO - maybe just some sort of general picture of outer space as shown below. It's a little nicer than plain black but it won't overwhelm you or force your eyes away from the main artwork located on the top of the table.
I really don't like the look of the plate so I am going to hide it completely. To do this I need to complete several tasks. First, place the plate in the screw holes and trace it with a pen or marker. Next, remove the plate and you are left with the outline. Here's the tricky part - you need to rout out some of the material in the control panel so the plate will sit flush with the top and then when you lay down the artwork it will be covered completely. The router depth must be set to the thickness of the trackball plate and you should use a dado-cutting bit to make the cut (obtained from www.mlcswoodworking.com). The cut must be done freehand with the router but it doesn't have to be perfect as long as you stay as close to the line that was traced around the plate - any imperfections will be covered by the artwork once it is in place. Make sure to clamp the control panel down to the work bench before making any cuts. You don't want it to get away from you. Once there is a lip formed around the plate, it can be fastened to the control panel and it should be flush with the top.
Now the artwork can be installed over the top of the entire control panel. Once it is applied, flip the control panel over and use an exacto knife (razor blade) to cut out the button holes, the joystick holes and the trackball hole. The only one you have to pay very careful attention to is the trackball hole because it is the only one that is not going to be covered with some sort of trim (bezel) when the buttons are installed.
I will be posting detailed pictures of this process when I actually get around to doing it (hopefully this weekend). Stay tuned!

2 comments:
I've enjoyed reading your blog and I have a few questions. Did you purchase a kit from arcadedepot.com or did build your own. If you did build your own, what plans did you use and what kind of wood did you choose? Is your coin door on a hinge so that you can easily open it to collect and recycle your tokens? Does your monitor require a special video card to work? Thanks.
I did purchase an unfinished kit from arcadedepot.com. They did a pretty good job overall - customer service was great but I though the table top was a little unevenly cut - it looks great but I am super anal. I'd rate them a B+ overall.
The coin door is hinged - it opens easily using the key that came with it. It's the part that gets the most oohs and aahs when I show it to people. I plan on using a small cardboard box or something to catch the coins and tokens when it is finally operational. I'm not sure if there will be room for a regular sized coin box.
My monitor does NOT require any special video card (that I know of). I'm not too good with computers but when the monitor arrived I just plugged it in and it fired right up when I launched MAME. It looks fantastic!
Thanks for looking!
Post a Comment